The Taskbar Shuffle is a cool freeware that enable us to drag and drop the taskbar buttons and tray icons in Microsoft Windows.
By default, Microsoft Windows let us drag and drop almost everything on the screen, but not the taskbar and tray icons. Sometimes when you open too many applications at the same time, you might want to reorganize your taskbar by dragging all the related taskbar buttons together. That's when Taskbar Shuffle will come in handy.
I have tried this freeware myself and it works great for me. If you are like me who always like to run multiple applications at a time, give it a try. :)
Showing posts with label Cool Tips. Show all posts
Showing posts with label Cool Tips. Show all posts
Thursday, July 31, 2008
Thursday, June 26, 2008
Free PDF Editor
I recently received a PDF file from my friend which I want to make a little editing before sending it to others. I was stuck there for a while, looking for a free PDF editor software, as it is obviously not worth for me to purchase a commercial PDF Editor software just for one time (or occasional) use. It took me quite some time, but I finally manage to find a few ways to edit PDF file for free.
Editing PDF Files using OpenOffice
I figured the best way to edit a PDF file is to use OpenOffice 3.0.
OpenOffice is an open-source office software suite for word processing, spreadsheets, presentations, graphics, databases and more... You can basically consider it as the free version of Microsoft Office. It can be downloaded and used completely free of charge for any purpose, which is great.
In the latest version of OpenOffice -- 3.0 (which is still in Beta stage), a PDF Import Extension allows modifying existing PDF files for which the original source files do not exist anymore. With this extension installed, PDF documents will be imported in Draw and Impress, preserving the layout of the original PDF file and allowing basic editing.
This method is applicable to not only Microsoft Windows user, but also to those who use Linux or Mac.
How To Edit PDF File With OpenOffice
First, you will need to install OpenOffice 3.0. The free download is available here.
Then download and install the Sun PDF Import Extension. To install an extension to the OpenOffice, simply open one of the OpenOffice application such as the Writer, then go to Tools > Extension Manager, and add the extension there.
After installing the Sun PDF Import Extension, whenever you try to open a PDF file, OppenOffice will automatically import and open it in Draw (one of the OpenOffice application). From there, you will be able to edit the PDF document and then export it back as a PDF after finish editing it.
Editing PDF Files With PDF to Word Doc Converter
Another way to edit an existing PDF document is by converting it into Microsoft Word format. Here's a free application capable of converting a PDF into Microsoft Word: Free PDF to Word Doc Converter. The idea is simply converting a PDF file into Words document, edit it, and then convert it back to PDF format. There's a limitation using this method though. If the PDF document that you try to convert contains images, the converter fails to maintain the original layout of the PDF file. Unless you find a better converter, this method applies to PDF documents with only plain text, or with very few images.
There are several commercial PDF Editors out there, such as Foxit PDF Editor (USD99 per license), or the Adobe Acrobat (USD299 per license) that have lots of great features which make PDF editing an extremely easy task. If you need to edit PDF file on a frequent basis, you may consider purchasing these software. But if you are like me who only need it once in a while, and looking for a free PDF Editor, you may try out the method above :).
Saturday, June 7, 2008
Free Blogger Template
Just completed my first free blogger template. 
I use blogger blog often. Besides this blog which I use to talk about interesting cool stuff, I own a few other niche blogs that are also running on blogger blog. Each time I setup a new blogger blog, I will spend a little time to modify the standard delivered blogger template, so that the layout looks more unique and professional. It takes me quite some time to design a new blogger template, but it turns out to be quite a fun thing to do. So I will keep designing new blogger template whenever I setup a new blogger blog, and then what I will do is modify it a bit and release it on this blog for free download.
So here's the first free blogger template from me:
Click here to see the demo.
And here's download link of the XML code (Right click, then save target as).
Built-in features of this blogger template:
1. Yahoo + some extra cute emoticons. A javascript is already included in the template that will automatically convert some predefined characters into emoticons. To learn how to use them, read this post: Use emoticons on blogger blog.
2. Social bookmarks icon at the end of each post. This is a feature created by Beautiful Beta. It will give your blogs reader the convenience to easily bookmark your post on various social bookmarking service. If you want to add this feature to your blog without using my blogger template, read this post from Beautiful Beta to learn how to do it.
How to use my free blogger template:
1. Download the xml file using the above link.
2. Login to your blogger account.
3. Go to Layout > Edit HTML.
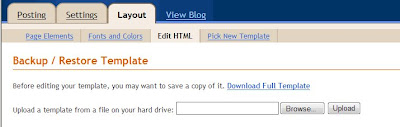
4. Click on the 'Download Full Template' link to backup your current template.
5. Click the 'Browse' button and upload the coolbloggertemplate.xml file that you have just downloaded.
6. Done.
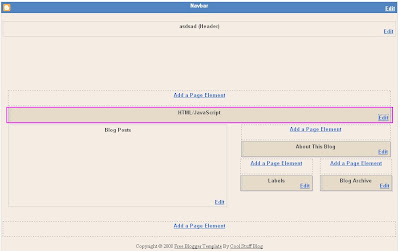
When you first install the template, you will notice that top navigation bar, where I place the Home, About, etc. button doesn't show up. In order to add these buttons, go to Layout > Page Elements, and click the edit link on the 'HTML/JavaScript' element which is located directly above the 'Blog Post' element (as highlighted in the screenshot below).
Leave the title field blank, and paste the following code to the content field:
Replace the 'YOUR URL HERE' and 'BUTTON1', 'BUTTON2' with your own url and the button name of your own. Each line of the code represent one button. You can add or remove button just by adding or removing the code.
And that's it. Hope you like my first template design. If you want more, here are a list of free blogger templaes designed by others.
I use blogger blog often. Besides this blog which I use to talk about interesting cool stuff, I own a few other niche blogs that are also running on blogger blog. Each time I setup a new blogger blog, I will spend a little time to modify the standard delivered blogger template, so that the layout looks more unique and professional. It takes me quite some time to design a new blogger template, but it turns out to be quite a fun thing to do. So I will keep designing new blogger template whenever I setup a new blogger blog, and then what I will do is modify it a bit and release it on this blog for free download.
So here's the first free blogger template from me:

Click here to see the demo.
And here's download link of the XML code (Right click, then save target as).
Built-in features of this blogger template:
1. Yahoo + some extra cute emoticons. A javascript is already included in the template that will automatically convert some predefined characters into emoticons. To learn how to use them, read this post: Use emoticons on blogger blog.
2. Social bookmarks icon at the end of each post. This is a feature created by Beautiful Beta. It will give your blogs reader the convenience to easily bookmark your post on various social bookmarking service. If you want to add this feature to your blog without using my blogger template, read this post from Beautiful Beta to learn how to do it.
How to use my free blogger template:
1. Download the xml file using the above link.
2. Login to your blogger account.
3. Go to Layout > Edit HTML.

4. Click on the 'Download Full Template' link to backup your current template.
5. Click the 'Browse' button and upload the coolbloggertemplate.xml file that you have just downloaded.
6. Done.
When you first install the template, you will notice that top navigation bar, where I place the Home, About, etc. button doesn't show up. In order to add these buttons, go to Layout > Page Elements, and click the edit link on the 'HTML/JavaScript' element which is located directly above the 'Blog Post' element (as highlighted in the screenshot below).

Leave the title field blank, and paste the following code to the content field:
<li><a href="YOUR URL HERE">BUTTON1</a></li>
<li><a href="YOUR URL HERE">BUTTON2</a></li>
<li><a href="YOUR URL HERE">BUTTON3</a></li>
<li><a href="YOUR URL HERE">BUTTON4</a></li>
Replace the 'YOUR URL HERE' and 'BUTTON1', 'BUTTON2' with your own url and the button name of your own. Each line of the code represent one button. You can add or remove button just by adding or removing the code.
And that's it. Hope you like my first template design. If you want more, here are a list of free blogger templaes designed by others.
Wednesday, May 28, 2008
Backup Blogger Content
If you are using blogger.com as your blogging platform, here's a great tool for you -- Blogger Backup from Codeplex.
Blogger Backup is a free software that enable you to easily backup your blog posts and comments in your local hard drive, and restore them when needed. The software is free. It's one of the project of CodePlex, an open source community.
Why do we need to backup our content for blogger blogs? The answer is for precaution that this message shows up on your blogger account one day:
“This blog has been locked by Blogger’s spam-prevention robots. You will not be able to publish your posts, but you will be able to save them as drafts.”
Blogger.com is aggressively locking out accounts that they suspect to be spam blogs recently. So in case your blog is mistakenly treated as a spam blog, and you are not able to claim it back, you can at least restore your blog quickly by republish everything on a new account.
Saturday, May 17, 2008
Cool Free Software For XP and Vista
I have recently installed two really cool software on my PC. Both of them are free.
The first software is called RocketDock. A "Dock" is simply an application launcher that allows you to easily run your favorite programs that you use frequently. It's a feature that has always been available in Mac OS X but not in Windows XP and Vista (unless you install RocketDock). By installing RocketDock, you will have a bar of icons at the top, bottom or side of your Windows desktop, which looks very much like the dock in Max OS X. Watch this video to see how the RocketDock works.. it's really cool:
The second software is called Dexpot. It's a software that allows you to create multiple virtual desktops on XP or Vista, so that you have more workspace on Windows. Here's the brief description of Dexpot's features:
Again, Virtual Desktop has always been a useful features in the Linux operating system, but not in Windows. But now with Dexpot, we can have this great feature on XP or Vista as well!
It's great to discover all these useful softwares that we can install for free. Thanks to those who created the software, and generously release them for free to the public :)
P.S. Check out also the free registry cleaner and also this cool software that I use to make my Windows XP looks just like Vista!
The first software is called RocketDock. A "Dock" is simply an application launcher that allows you to easily run your favorite programs that you use frequently. It's a feature that has always been available in Mac OS X but not in Windows XP and Vista (unless you install RocketDock). By installing RocketDock, you will have a bar of icons at the top, bottom or side of your Windows desktop, which looks very much like the dock in Max OS X. Watch this video to see how the RocketDock works.. it's really cool:
The second software is called Dexpot. It's a software that allows you to create multiple virtual desktops on XP or Vista, so that you have more workspace on Windows. Here's the brief description of Dexpot's features:
"Dexpot allows you to create multiple, virtual desktops to increase the work area of your screen by up to 20 times. Each virtual desktop is independent from the others and can have its individual wallpaper, resolution, and icons (or no icons at all). You can easily switch between desktops from the tray icon, or via hotkey, or even use an automatic desktop slideshow that rotates all virtual desktops. In addition, you can move and copy windows from one desktop to another among the desktops, set up rules to automatically move, copy or close windows and more. Dexpot is one of the most advanced desktop managers out there, that is easy enough for beginners, but offers some great flexibility for more demanding users as well."

Again, Virtual Desktop has always been a useful features in the Linux operating system, but not in Windows. But now with Dexpot, we can have this great feature on XP or Vista as well!
It's great to discover all these useful softwares that we can install for free. Thanks to those who created the software, and generously release them for free to the public :)
P.S. Check out also the free registry cleaner and also this cool software that I use to make my Windows XP looks just like Vista!
Wednesday, April 2, 2008
Make Firefox Faster
I came across a few cool tricks that will make Firefox run faster. The tricks are actually quite old as they have been around the Internet for quite some time, but it still works great for me, so I think it's worth sharing here.
(If you are still using IE, I recommend you to download Firefox now. It's a free web browser, with enhanced security and a bunch of cool stuff.)
Here are the cool tricks to make Firefox faster in loading pages:
1. On the URL bar, enter "about:config".
2. In the filter, enter "network.http.pipelining" to bring up this preference name. By default, the value is set to "false". Double click on it to change the value to "true".
3. Enter "network.http.proxy.pipelining" in the filter to bring up this preference name, and double click on it to turn the value to "true".
4. Enter "network.http.pipelining.maxrequests" in the filter to bring up this preference name. The default value is 4. Double click and set the value to 10.
By doing the few tweaks above, your Firefox web browser will become much faster in loading pages.
What does the tweak do?
When we are browsing the Internet, our web browser (Firefox) is the client, and will be requesting data from the servers (e.g. YouTube, FaceBook, Blogger etc..) to be displayed on the browser. By default, most of the web browser (including Firefox) will be sending one request at a time to the server, and wait for the respond from the server before sending the next request. By doing the setting above, we are actually enabling what we call the HTTP pipelining which enable Firefox to send multiple request simultaneuously without having to wait for the respond from server. And the number of requests that we can send in one time is controlled by the value that we entered for "network.http.pipelining.maxrequests" (step 4), which we have set it to 10. By doing this, Firefox will now be sending 10 request at a time, which will make it load much faster.
Any side effect for making this tweak?
Yes, some servers that do not support pipelining are not able to handle multiple request will cause page to load incorrectly. That is the reason Firefox has it turned off by default. But I haven't got any problem so far after making this tweak, and my Firefox did perform much faster. I assume most web server nowadays do support pipelining.
Are there more tweaks to make Firefox even faster?
There are actually a few more preferences that can be tweak, but some of them will harm the performance if set incorrectly. There's no best setting for everyone as the tweak will base on the combination of bandwidth, CPU speed, and personal preference. Visit the mozillaZine knowledgebase for more Firefox tweaking preference. I would recommend to make only the pipelining tweak, and stick to the default setting for other preferences. Enabling the pipelining alone will make Firefox much faster!
Thursday, March 6, 2008
Make XP Look Like Vista
If you are still a Windows XP user like me, you should definitely check out this cool free software called Vistamizer, which can make your XP look like Vista. While there has been quite some negative comments about Windows Vista since its release last year, one thing for sure is the new graphical interface of Vista is really cool.. a lot cooler than Windows XP. So in order to make XP look like Vista, I use this cool stuff called Vistamizer. This cool software will modifies your system files, and totally convert your system into the cool Vista GUI. You will not remember how your old desktop looks like after installing Vistamizer. The good thing about this software is that it will backup all the changes that have been made to your system, so you can easily revert it back to the original system setting.
I installed Vistamizer on my Windows XP few days back, and have no complaint on it so far. It's stable, and does not affect the system performance. My friend actually thought that I have upgraded to Vista when I show them my new desktop :P. A great software to make XP look like Vista.
I installed Vistamizer on my Windows XP few days back, and have no complaint on it so far. It's stable, and does not affect the system performance. My friend actually thought that I have upgraded to Vista when I show them my new desktop :P. A great software to make XP look like Vista.
Sunday, February 24, 2008
MSN Messenger Tricks
In my previous post titled Cool Cool MSN Messenger Tricks, I have given some cool tips and tricks for MSN Messenger (or Windows Live Messenger). I explained on how to change a cool skin and how to remove the advertisement from the MSN Messenger. I also provided some cute MSN emoticons for download. If you haven't read the previous post yet, follow the link above to get all the cool stuff that I have just mentioned.
In this post, I will be sharing a few more cool MSN Messenger tricks. All the tricks that I am going to share will require to have Messenger Plus!Live (MP!L) installed. If you have not yet install MP!L and do not know where to get it, go back to read my previous post. I have given the download link and also the installation guide there.. Read on if you have already installed MP!L.
MSN Messenger Tricks #1 - Sending Continuous Nudge
You might have experienced this before: one of your friend on MSN messenger keeps sending you non-stop nudges continuously, until you can hardly do anything on your MSN messenger. When you try to do the same back to him, you get the message "You may not send a nudge that often". If you have this experience before, I bet you will be desperately trying to find out how did your friend do those annoying stuff while you are not able to the same. And the answer is you need to install the NudgesToolsScript in order to do this. Just download the script and execute it (double click the .plsc file.. you will get a warning message.. just check the the check box that says "I accept the responsibility of installing this script" and click 'Import'). After installing the script, you will now be able to send continuous nudges to your friend with no delay. If you really want to annoy any of your friend :P, type "/sendnudge 1000 100" (without the double quotes) and hit enter. Your friend will then get 1000 nudges every 100 milliseconds! By the default setting, your own chat window will also be vibrating when you send nudges.. To prevent vibration on your own chat window, do this: go to Tools > Option > Messages, and uncheck the "Allow me to send and receive nudges" checkbox so that your chat window will not vibrate when sending nudges to your friend. To stop the nudges, type "/stopnudge" and it will stop immediately.
MSN Messenger Tricks #2 - Find out if somebody has blocked you on MSN
This is probably one of the most frequently asked question: how can I know if someone has block me on MSN messenger. There are lots of online services out there which claims to be able to check if someone has blocked you. As far as I know, many of them contains some sort of spyware, and will intrudes your MSN and sends annoying automated messages to all of your contacts. So instead of using those so called MSN block checker, here's a manual way to check if someone has blocked you:
1. Register a new MSN account. Use a different nick name so that no one can recognize that it's you.
2. Sign in to MSN on both your actual account and your new fake account. Having MP!L installed, you can sign in to 2 separate session of MSN simultaneously using different account.
3. Add the contact that you want to check using your new account. If at anytime, someone appears online, or accept you into his/her contact on the new account, but appears offline in your actual account, he/she has blocked you.
This seems to be a more troublesome way, but it saves you from being intruded by spyware, and most importantly, it works. :)
MSN Messenger Tricks #3 - Cool effects on MSN display name
This is a cool trick that enable you to easily edit your display name and make it looks cooler. Install the script NameEditor. Then go to the script button (somewhere on the top of the messenger), and choose NameEditor > Edit Name. The Name Editor window will appears, which which enable you to fill in some cool effects for your display name. This will easily make your name stand out among all the names in your friends' contact list.
MSN Messenger Tricks #4 - Check Gmail with MSN Messenger
The original MSN Messenger will only alert you when you receive an email in your Hotmail account. With the Gmail Checker script, we will also be receiving incoming email alert for Gmail account. A pretty useful feature to be added to MSN Messenger!
MSN Messenger Tricks #5 - Let your keyboard's LED alert you when you have incoming message
This is a cool script that will flashes your keyboard's LED, and plays a beep sound from your laptop when you receive incoming MSN message. Just install the script KeyFlasher, and start playing around with the script configuration. You can specify which LED to flash (Num Lock / Caps Lock / Scroll Lock), the speed of the flashes, amount of the flashes, etc.. Simple and fun!
MSN Messenger Tricks #6 - Easily translate the text in chat window
Another very useful and cool script to be installed on your MSN messenger is the GoogleTranslator. You can easily translate the text in your chat window into another language by just hitting F5 on your keyboard. As the script name suggest, this script is using Google's translator to do the translation.. which means it supports multiple languages translation! A really useful script.
With MP!L script, there are so many tricks that we can do with MSN Messenger. These are just some of the cool and useful MSN Messenger tricks that people would usually looks for. Hope you find this information useful. :)
Monday, February 18, 2008
Use Emoticon On Blogger Blog
If you read through some of the posts on the Cool Stuff blog, you will notice that I use emoticons quite frequently. While writing good article is important, adding emoticons to a blog post makes it looks more interesting. To add emoticons to a blogger blog, follow the following steps:
1. Sign in to your blogger blog, and go to Layout > Edit HTML
2. Add the following line of code to the head section of of your template. The best place to insert this code is right before </head> tag.
<script src="http://mltan100.googlepages.com/emoticons.js" type="text/javascript"/>
By doing this, you are actually adding a javascript to your blog. Everytime any page of your blog is loaded, the javascript will automatically change certain pre-defined characters / symbols into emoticons.. So after inserting the javascipt, you will use the following pre-defined characters to invoke the emoticons:
Please take note that in order to call up the emoticons in your blog post, there should be no spaces in between the characters. I include spaces in the list above because I do not want the javascript to convert them into emoticons, so that you can see the characters.
Blogger.com is one of the most popular free blogging platform today. There are millions of blogger blogs out there on the Internet. Adding emoticons to your blogger blog is one of the cool stuff that you can do to make your blog stand out from the others. I like to use emoticons in my post. I express myself better with emoticons.
(p.s. I have received quite a number of emails asking for helps. Unfortunately I do not have time to reply each of them.. If you have problems implementing the emoticons on your blog, try to learn HTML, and some basic Javascript. It should help )
)
1. Sign in to your blogger blog, and go to Layout > Edit HTML
2. Add the following line of code to the head section of of your template. The best place to insert this code is right before </head> tag.
<script src="http://mltan100.googlepages.com/emoticons.js" type="text/javascript"/>
By doing this, you are actually adding a javascript to your blog. Everytime any page of your blog is loaded, the javascript will automatically change certain pre-defined characters / symbols into emoticons.. So after inserting the javascipt, you will use the following pre-defined characters to invoke the emoticons:
| Most Yahoo emoticons will work with this javascript. Example: | |||
| : ) | | : P |  |
| : D |  | : ) ) |  |
| = ) ) |  | = D > |  |
| Besides Yahoo Emoticons, I have also added the following cool emoticons for MSN into my blog: | |||
| / wa ha ha |  | / hi hi |  |
| / o m g |  | / n o |  |
| / dig nose |  | / s w e a t |  |
| / s h o c k |  | / f l o o r |  |
| / h m m |  | / X D | |
| / b l u r |  | / b l u s h |  |
| / no big deal |  | / p l e a s e |  |
| / b y e |  | ||
Please take note that in order to call up the emoticons in your blog post, there should be no spaces in between the characters. I include spaces in the list above because I do not want the javascript to convert them into emoticons, so that you can see the characters.
Blogger.com is one of the most popular free blogging platform today. There are millions of blogger blogs out there on the Internet. Adding emoticons to your blogger blog is one of the cool stuff that you can do to make your blog stand out from the others. I like to use emoticons in my post. I express myself better with emoticons.
(p.s. I have received quite a number of emails asking for helps. Unfortunately I do not have time to reply each of them.. If you have problems implementing the emoticons on your blog, try to learn HTML, and some basic Javascript. It should help
)
Saturday, January 26, 2008
Cool MSN Messenger Tricks
I am really into MSN messenger. It's one of the coolest instant messaging service that I like to use the most. There are so many fun and cool stuff that can be done with MSN messenger. Most people just install and start using it without realizing all the fun and cool stuff that they could have done. I am going to share some cool MSN Messenger tricks here :).
The first thing that I would always do, is to install Messenger Plus! Live. It's a add-on freeware for Windows Live Messenger which adds lots of features and extras that make your MSN instant messenger easier, more useful or just tons more entertaining. While this software does come with embedded advertisement program, the creator of the software, Patchou is generous enough to let the user choose whether to install the ads. Just choose "I refuse to give my support, don't install the sponsor" during the setup, and the MP!L will be totally ads free. Of course, Pat will be thankful if you choose to support him by installing the sponsor program :P. By having MP!L installed, you already have some really cool features for your MSN instant messenger such as: running multiple Messenger sessions, hiding it in the system tray, multiple tabs chat box, and tons of other cool tricks to play around on your MSN Messenger.
Now, after installing MP!L, another cool trick that I would do is to change the skin of my MSN messenger. The original skin from Microsoft looks clean and neat.. but not cool enough.. not my style :P. So let's give it a cool skin then. With the new Messenger skinning feature in the latest release of MP!L(4.5), installing a new skin is really easy. Choose a cool skin that you like here, and download it for free. After downloading any skin that you like, double click on it (.plsk file), and you will be asked to restart your MSN messenger with your brand new skin.. You can download and import as many skin as you want, then easily switch among all the skins that have been imported at anytime later. If you like, you can even create a cool MSN instant messenger skin yourself using MP!L (read the developer guide here)..
Okay, we have a cool skin for our MSN messenger now.. but the advertisement is spoiling it. So the next trick that I would do is to get rid of the advertisement. (Warning.. This is illegal.. so if you do not want to involve in any illegal stuff, then skip this part :P). The trick to remove advertisement from MSN Messenger, is to use this free software called A-Patch -- an utility to customize visual and functionality aspects of MSN Messenger. A-Patch is available for download here (choose the version accordingly). To remove advertisement from MSN Instant Messenger, follow these steps:
My MSN messenger looks really cool now -- a cool skin with no advertisement. To start doing some really cool tricks from MSN Messenger, we will install some custom developed scripts. That will equip our MSN messenger with some really cool functionalities. This is yet another cool feature from MP!L that allow us to install custom developed scripts to the MSN instant messenger. There is a good collection of cool scripts on the MP!L website that you can download. With these scripts, we can do some really useful and cool stuff like checking gmail with MSN messenger, downloading YouTube videos, or some really nasty stuff like sending non-stop continuous nudge, stealing contacts and images, or impersonate as the contact you are talking with. If you wish to develop your own script, find the scripting documentation on MP!L website. I will be writing another post about cool MSN Messenger tricks using ML!L scripts. Stay tuned. :)
Another really cool stuff for MSN instant messenger is the i-Buddy: a USB device that looks just like a MSN messenger buddy characters. This is something extra that is not so related to MSN messenger tricks, but I find this little new product pretty cool. It can interact with events on MSN Messenger: detects emotions (via emoticons) within messages and reacts accordingly. For instance if someone puts a heart emoticon in their message, i-Buddy's head glows and it twists and flaps its wings. And if the blushing emoticon is detected, i-Buddy will glow red. Even cuter, a gleaming red heart in i-Buddy's chest illuminates whenever a contact is online. Isn't that cool? :)
And finally, here are some cute emoticons for MSN instant Messenger:
/hihi /wahaha /OMG /XD /floor /blush /dignose
If you like them, you can download them here.
That's all about the first part of cool MSN Messenger tricks that I want to share. Hope you find it useful :). There will be more MSN messenger tricks that I will be sharing in the coming posts. So stay tuned.
The first thing that I would always do, is to install Messenger Plus! Live. It's a add-on freeware for Windows Live Messenger which adds lots of features and extras that make your MSN instant messenger easier, more useful or just tons more entertaining. While this software does come with embedded advertisement program, the creator of the software, Patchou is generous enough to let the user choose whether to install the ads. Just choose "I refuse to give my support, don't install the sponsor" during the setup, and the MP!L will be totally ads free. Of course, Pat will be thankful if you choose to support him by installing the sponsor program :P. By having MP!L installed, you already have some really cool features for your MSN instant messenger such as: running multiple Messenger sessions, hiding it in the system tray, multiple tabs chat box, and tons of other cool tricks to play around on your MSN Messenger.
Now, after installing MP!L, another cool trick that I would do is to change the skin of my MSN messenger. The original skin from Microsoft looks clean and neat.. but not cool enough.. not my style :P. So let's give it a cool skin then. With the new Messenger skinning feature in the latest release of MP!L(4.5), installing a new skin is really easy. Choose a cool skin that you like here, and download it for free. After downloading any skin that you like, double click on it (.plsk file), and you will be asked to restart your MSN messenger with your brand new skin.. You can download and import as many skin as you want, then easily switch among all the skins that have been imported at anytime later. If you like, you can even create a cool MSN instant messenger skin yourself using MP!L (read the developer guide here)..
Okay, we have a cool skin for our MSN messenger now.. but the advertisement is spoiling it. So the next trick that I would do is to get rid of the advertisement. (Warning.. This is illegal.. so if you do not want to involve in any illegal stuff, then skip this part :P). The trick to remove advertisement from MSN Messenger, is to use this free software called A-Patch -- an utility to customize visual and functionality aspects of MSN Messenger. A-Patch is available for download here (choose the version accordingly). To remove advertisement from MSN Instant Messenger, follow these steps:
1. Exit from Windows Live Messenger.
2. Extract and execute the A-Patch executable.
3. You will be prompted Advance Options screen on the first run. Just click OK to select the default.
4. On the Welcome window (page 2), select “Patch Messenger” under “Choose an Option”, and make sure the path to the Windows Live Messenger is correct (default should be C:\Program Files\MSN Messenger which is shown automatically, unless you change your installation directory, otherwise leave it as it is.).
5. Choose whatever item that you wish to remove from the Live messenger by checking the chack box, then click 'Next' all the way to the last screen. Be sure to check the "Remove Advertisement" option whenever you see one on each page.
My MSN messenger looks really cool now -- a cool skin with no advertisement. To start doing some really cool tricks from MSN Messenger, we will install some custom developed scripts. That will equip our MSN messenger with some really cool functionalities. This is yet another cool feature from MP!L that allow us to install custom developed scripts to the MSN instant messenger. There is a good collection of cool scripts on the MP!L website that you can download. With these scripts, we can do some really useful and cool stuff like checking gmail with MSN messenger, downloading YouTube videos, or some really nasty stuff like sending non-stop continuous nudge, stealing contacts and images, or impersonate as the contact you are talking with. If you wish to develop your own script, find the scripting documentation on MP!L website. I will be writing another post about cool MSN Messenger tricks using ML!L scripts. Stay tuned. :)

Another really cool stuff for MSN instant messenger is the i-Buddy: a USB device that looks just like a MSN messenger buddy characters. This is something extra that is not so related to MSN messenger tricks, but I find this little new product pretty cool. It can interact with events on MSN Messenger: detects emotions (via emoticons) within messages and reacts accordingly. For instance if someone puts a heart emoticon in their message, i-Buddy's head glows and it twists and flaps its wings. And if the blushing emoticon is detected, i-Buddy will glow red. Even cuter, a gleaming red heart in i-Buddy's chest illuminates whenever a contact is online. Isn't that cool? :)
And finally, here are some cute emoticons for MSN instant Messenger:
/hihi /wahaha /OMG /XD /floor /blush /dignose
If you like them, you can download them here.
That's all about the first part of cool MSN Messenger tricks that I want to share. Hope you find it useful :). There will be more MSN messenger tricks that I will be sharing in the coming posts. So stay tuned.
Monday, January 7, 2008
Cool Computer Tricks
When you are on a computer that does not have Internet Explorer, FireFox, or any other Internet browser, how are you going to surf the Internet? The answer is: use the calculator.
This video will show you how to use calculator on Microsoft Windows to surf the net:
This trick works on other Windows application such as Notepad and Paint as well.. This trick does not work on Window Vista though.
This video will show you how to use calculator on Microsoft Windows to surf the net:
This trick works on other Windows application such as Notepad and Paint as well.. This trick does not work on Window Vista though.
Tuesday, November 20, 2007
Tuesday, July 17, 2007
How To Use Google To Search

I know everyone knows how to use Google to search. I am not trying to insult whoever reading this post :P, but there are some features on Google that not everyone of us knows about. Here are some useful samples:
- Calculator - try enter '12 + 34 - 56 * 7 / 8' or whatever basic arithmetic in Google search box and hit search.
- The '-' operator to filter word from search. Example: bill gates -microsoft will search for the word Bill Gates but not the word Microsoft.
- The 'define:' operator provide definitions for words, phrases, and acronyms from the Web. Example: define:ipod
- The '..' operator search within a range of numbers. Example: Die Hard 1..4
- The operator 'movie' will Find reviews and showtime. Example: movie: Harry Potter
- The 'related:' operator list web pages that are similar or related to the URL. Example: related:www.google.com
Wednesday, July 11, 2007
How To Download YouTube Movie Clip Into Local Hard Disk
There are many many interesting video clips on YouTube. But too bad that YouTube doesn't provide a way to download them into our local storage devices. So when I come across any cool stuff on YouTube that I want to keep one copy for myself, I use VDownloader to save it into my PC hard disk. It's a freeware available for download here. Vdownloader is an executable file which is only 2.63MB in file size, and able to do movie download from Youtube, Google and Grinvi videos on our computer in mpeg or avi format. No installation is needed. I have used it to download several video clips from YouTube, and it's free from virus/spyware. A useful freeware. Also, check out
Wednesday, July 4, 2007
The Cheapest Way Of Making Long Distance Call
I would like to share my experience of using the cheapest way to make long distance call. When I was in US for the past 2 months, I called back home and I called my gf almost everyday. The duration of each call is more than 45 mitutes. But it only cost me 10 Euro Dollar (about RM 46.65) to make all these calls, I mean all calls between the 2 months time during I was in US. /hmm
The way that to do this, is to use VoipBuster, a VOIP service provider which is similar to Skype, but cheaper. The reason that I choose VoipBuster, is simply because it's free to call from PC to Malaysia land-line (provided you have some credit in it's account). So what I did is I bought the minimum amount of credit which is 10 euro dollars (RM 46.65), and start calling back to Malaysia land line for free. The 10 euro dollar credit will not be deducted by calling Malaysia land-line, so I can use them to call Malaysia mobile phone line which cost o.o4 EUR (RM 0.19) per minute. Of course, there needs to be an Internet connection to use this service, and the hotel that I stayed includes free Internet connection.. /XD
The only drawback though, is that there will be some delay (about 1 to 1.5 seconds) when talking through VoipBuster, but is acceptable to me. So if you need to travel to other country for a long period of time and you want to call your girlfriend or boyfriend or mother or father or whoever everyday, try this method.
Subscribe to:
Posts (Atom)
